Hello! Lovelies
As of recent I have been loving my planner. It's so much fun. Not only is it functional and keeps track of the things I need to do and want. But its also creative and fun. I love decorating each week in a different colors and themes. I've also become addicted to all the different sticky notes you can get, "who knew there were so many?!?". You can get really cute ones from Little B, Teresa Collins and Target. Target has some of the best and most popular out there. And they only cost $1 a pack, a total score! If you can find them, they sell out rather quickly.
So anyways instead of keeping them in a drawer or on your desk and having to go get them every time you want to make a note, why not keep them organized in an ever so cute way inside your planner. So that's just what I did.
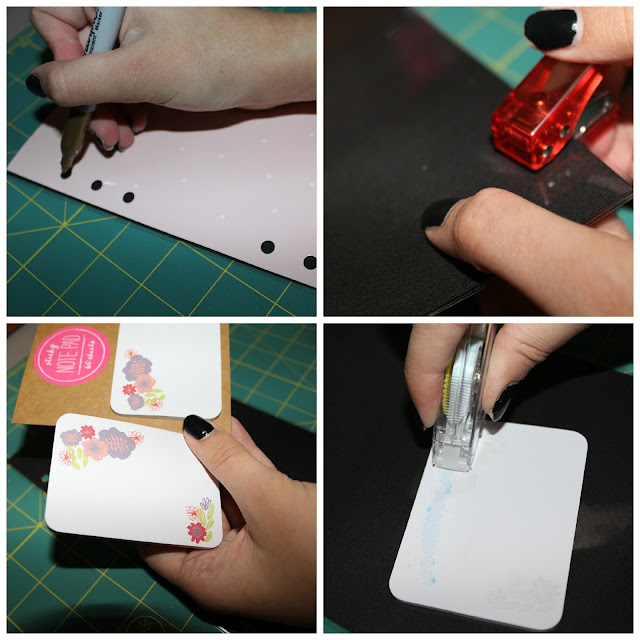
I made a Sticky Note Dashboard. And below is a step by step guide to how I did it.
As of recent I have been loving my planner. It's so much fun. Not only is it functional and keeps track of the things I need to do and want. But its also creative and fun. I love decorating each week in a different colors and themes. I've also become addicted to all the different sticky notes you can get, "who knew there were so many?!?". You can get really cute ones from Little B, Teresa Collins and Target. Target has some of the best and most popular out there. And they only cost $1 a pack, a total score! If you can find them, they sell out rather quickly.
So anyways instead of keeping them in a drawer or on your desk and having to go get them every time you want to make a note, why not keep them organized in an ever so cute way inside your planner. So that's just what I did.
I made a Sticky Note Dashboard. And below is a step by step guide to how I did it.


You'll need:
- Paper
- Sticky Notes
- Scissors
- Pencil
- Hole Punch
- Optional: Laminator

Having a Sticky Note Dashboard is great for those on the go that jot down a lot of notes. It's also fun to make because you have so many choices and you can make one that fits your style.
I hope you enjoyed this supper easy tutorial. If you'd like to see more DIYs like this please let me know. I have a couple other fun planner DIYs id love to share.
If you make one id love to see it. Tag me on Instagram or Twitter @ChicCountryGirl
~Love
Emily
Disclaimer: Any photos used are mine unless otherwise posted with a * . This post was 100% created by me. The opinions are 100% my own. If any of this is re-posted in any way give credit to TheChicCountryGirl. All images are copyrighted to this site.
This comment has been removed by the author.
ReplyDeleteWhere did you get your planner? It is so pretty!
ReplyDeleteIts a Kikki K planner in the large size.
DeleteI wish they sell sticky notes as cute as those you have in the US around here!!! (sticky notes dashboard wish horrible yellow post-it isn't so cute ^^)
ReplyDeletelove it!
ReplyDeleteI appreciate your unique perspective and insights in every post! Just discovered Core Ball Game – already sending the link to my gaming crew!
ReplyDelete